Electrical Panel Upgrade Cost 2026: Complete Pricing Guide
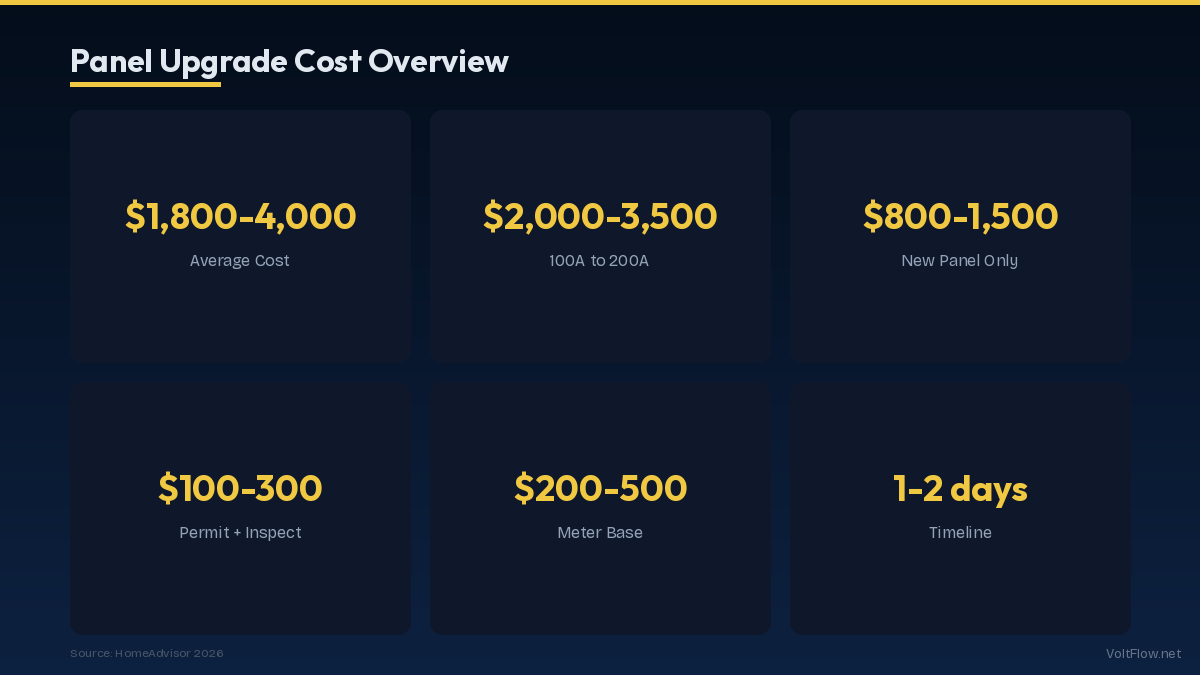
Upgrading your electrical panel is one of the most impactful home improvements you can make, especially as homes add EV chargers, heat pumps, and smart systems that demand more power. In 2026, the average cost to upgrade from a 100-amp to 200-amp panel ranges from $1,800 to $3,500, while a full service upgrade including the meter base and utility coordination runs $2,500 to $5,000. This guide breaks down every cost component, explains when you need an upgrade, and helps you budget accurately.
Average Panel Upgrade Costs by Type
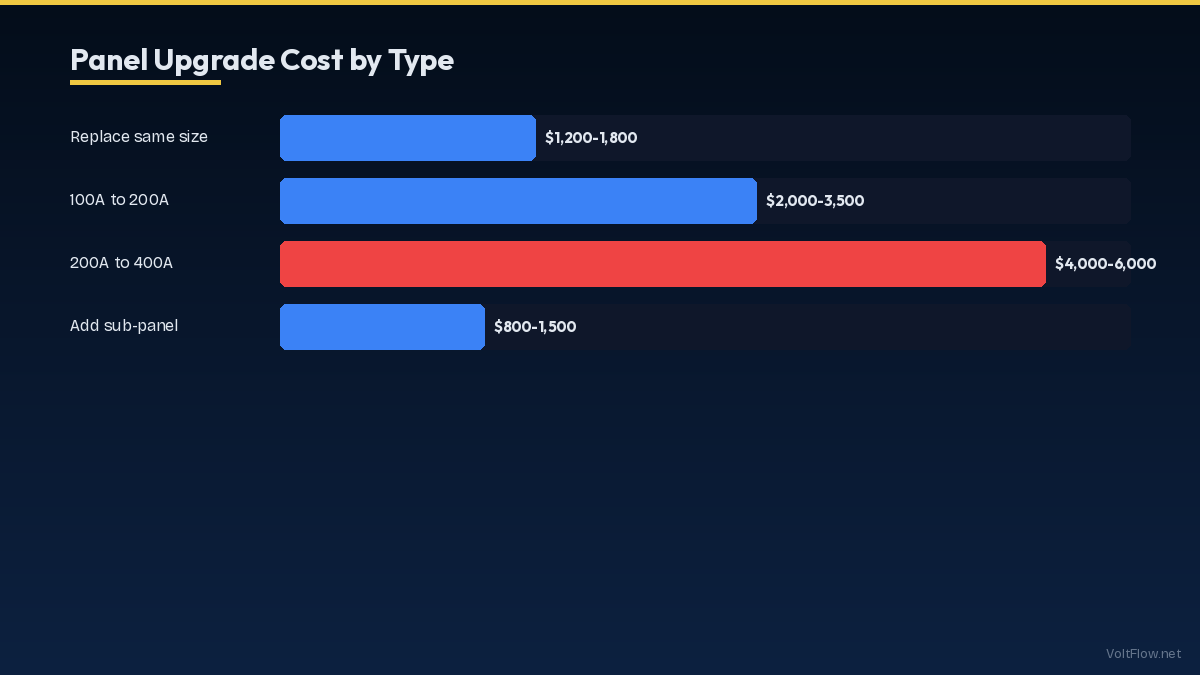
Electrical panel upgrades fall into several categories, each with different scope and pricing. The simplest is a panel swap, where you replace an outdated or full panel with a new one of the same amperage. A panel swap from an old Federal Pacific or Zinsco panel to a modern Square D or Eaton panel at the same 100-amp or 150-amp rating costs $1,200-$2,200 including labor and permits. This is typically done for safety reasons since Federal Pacific and Zinsco panels have well-documented failure rates where breakers do not trip during overcurrent conditions. A capacity upgrade from 100 amps to 200 amps is the most common residential panel upgrade in 2026. This involves replacing the panel itself, the main breaker, and usually the meter base and service entrance cable. The utility company must be involved to disconnect and reconnect service. Total cost ranges from $1,800 to $3,500 for a straightforward upgrade where the meter and service entrance are in good condition and just need upsizing. If the utility requires a new meter base, riser, or weatherhead, add $500-$1,000. A full service upgrade goes further by replacing everything from the utility connection point to the panel. This includes new service entrance cable, a new meter base, new weatherhead or underground service lateral, new grounding electrode system, and the panel itself. A full service upgrade to 200 amps costs $2,500-$5,000 and is required when the existing service entrance components are outdated, damaged, or not rated for the new amperage. Upgrading to 320-amp or 400-amp service for homes with extensive electrical needs like multiple EV chargers, commercial-style kitchens, or large workshop equipment costs $4,000-$8,000 or more. These installations require coordination with the utility for a larger transformer or dedicated feed, adding weeks to the timeline. Smart electrical panels like the Span Panel or Leviton Smart Panel add intelligence to your panel upgrade. The Span Panel costs $4,000-$6,500 installed and provides per-circuit monitoring, remote control, and dynamic load management that can eliminate the need for a larger service upgrade in some cases. If your utility charges demand fees or you need to manage EV charging around your existing capacity, a smart panel may save money compared to a full service upgrade.
Cost Breakdown: Where Your Money Goes
Understanding what you are paying for helps you evaluate quotes and identify areas where costs might be reduced or where cutting corners creates safety problems. The panel itself is surprisingly affordable. A quality 200-amp, 40-circuit panel from Square D, Eaton, or Siemens costs $150-$350 at wholesale pricing that electricians pay. A 42-space panel with copper bus bars sits at the top of that range. The main breaker adds $30-$80 depending on the amperage. Individual branch circuit breakers cost $5-$15 each for standard models and $25-$45 for AFCI or GFCI combination breakers. A fully loaded 40-circuit panel with a mix of standard and AFCI breakers has $200-$500 in breaker costs. The meter base costs $100-$300 for a standard 200-amp residential unit. Combination meter-main panels that integrate the meter socket and main breaker into one enclosure cost $400-$800 but save labor by eliminating a separate meter base. Service entrance cable, typically 2/0 or 4/0 aluminum SER cable for 200-amp service, costs $3-$6 per foot. A typical 15-30 foot run costs $45-$180 in cable. Conduit, connectors, ground wire, ground rods, and miscellaneous electrical supplies add $100-$300. So the total materials cost for a 200-amp panel upgrade is approximately $700-$1,500. If the total job costs $2,500, the remaining $1,000-$1,800 covers labor and overhead. A typical panel upgrade takes one electrician six to ten hours, and most shops send two electricians to complete the work in four to six hours of wall-clock time. At shop rates of $85-$150 per hour per electrician, labor runs $700-$1,500 depending on complexity and local rates. Permitting typically costs $75-$250. Utility coordination for the disconnect and reconnect is usually free but adds scheduling delays of one to four weeks depending on your utility company. Some utilities require the homeowner to arrange their own temporary disconnect through a separate service, adding $200-$400 for a temporary meter loop. When comparing quotes, ask each electrician to break down materials, labor, and permit costs separately. This reveals whether a higher quote reflects better materials, more labor hours for a complex installation, or simply higher margins.
Signs You Need a Panel Upgrade
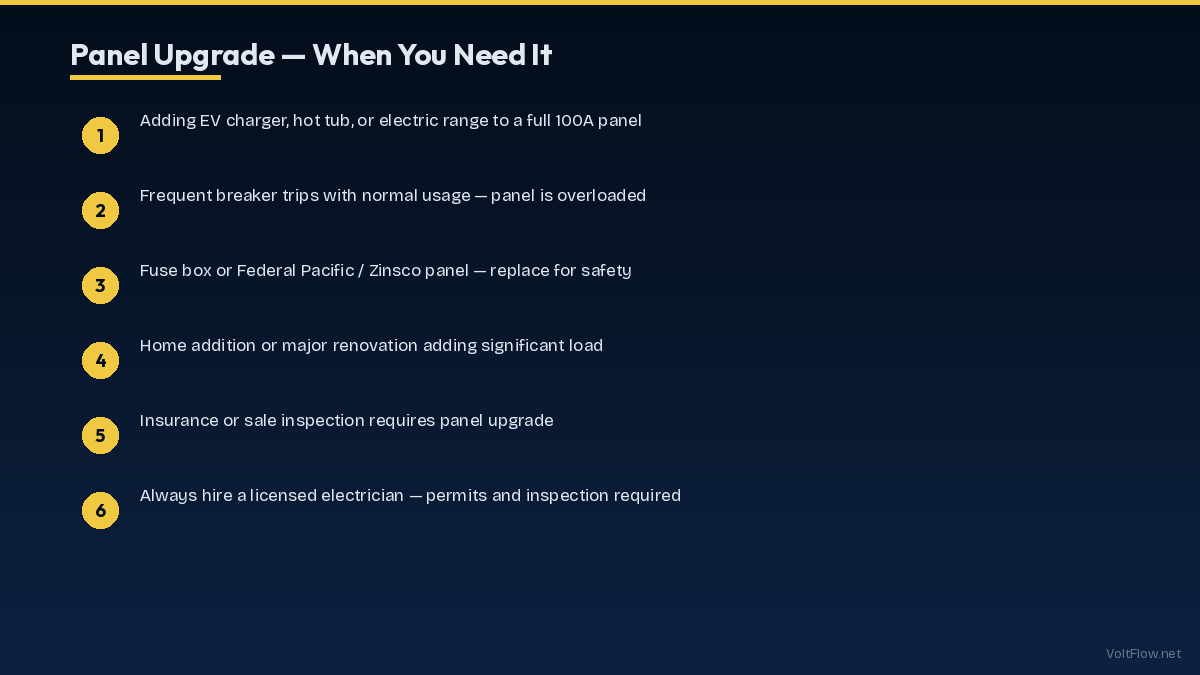
Several warning signs indicate your panel needs attention. Some are safety emergencies that require immediate action while others are planning signals that give you time to budget and schedule the work. If your panel is warm to the touch, smells like burning plastic, shows scorch marks, or makes buzzing or crackling sounds, stop reading and call an electrician today. These are signs of active arcing or overheating that can cause an electrical fire. Do not open the panel cover yourself as the components inside may be energized and dangerous. Less urgent but still important signs include breakers that trip frequently during normal use. If you routinely trip breakers when running the microwave and toaster simultaneously, or when the air conditioner kicks on while the dryer is running, your panel cannot handle your household load. Resetting breakers repeatedly wears them out and each trip cycle slightly reduces their reliability. Flickering or dimming lights when large appliances start are another sign of insufficient capacity. When a 30-amp air conditioner compressor starts on a 100-amp panel, it momentarily draws 60-80 amps of inrush current, causing voltage sag on every other circuit. A 200-amp panel absorbs these startup surges without noticeable effects. If you are planning to add an EV charger, heat pump, induction cooktop, hot tub, or any other large 240-volt load, check your panel capacity first. Add up all existing breaker ratings. If the total exceeds 80 percent of your main breaker rating, you need either an upgrade or a load management strategy. Homes built in the 1960s through 1980s often have 100-amp or 150-amp panels that were adequate for the era but cannot support modern electrical demands. Insurance companies are increasingly requiring panel upgrades on homes with Federal Pacific, Zinsco, or Pushmatic panels as a condition of coverage. If your insurance company has flagged your panel, the upgrade is not optional. If you are selling your home, a panel upgrade improves marketability and may be required by the buyer home inspection. Appraisers and home inspectors routinely flag panels under 200 amps, outdated panel brands, and evidence of double-tapped breakers or other code violations as deficiencies that affect sale price.
DIY vs Professional Installation
Electrical panel work is one area where DIY is strongly discouraged and in most jurisdictions legally prohibited without a license. The work involves the service entrance conductors that carry the full amperage of your home service, and these wires remain energized even when the main breaker is off because they connect upstream of the breaker at the utility meter. Only the utility company can de-energize service entrance conductors by pulling the meter, and they generally will not do this for unlicensed individuals. Beyond the legal and safety issues, panel work requires specific knowledge that goes beyond general electrical competency. Calculating the proper wire size for service entrance cables, correctly torquing bus bar connections, ensuring proper breaker compatibility with the panel brand, and meeting the NEC and local code requirements for grounding, bonding, and working clearances all require professional training. A mis-torqued connection that seems tight can loosen over time and arc, potentially causing a fire months or years after installation. Permit and inspection requirements for panel work exist in virtually every jurisdiction. The permit process requires a licensed contractor in most states, and the inspection verifies that the work meets code before the utility reconnects power. Skipping permits creates serious problems when selling the home, filing insurance claims, or if a fire investigation reveals unpermitted electrical work. What you can do yourself is prepare for the upgrade to save money. Clear the area around your panel to give the electrician unobstructed access. Move stored items, shelving, and anything within three feet of the panel. The NEC requires 36 inches of clear working space in front of the panel, 30 inches wide and up to the ceiling. Take photos of your existing panel with the cover removed, showing the breaker layout and wire routing. This helps electricians provide accurate quotes without a site visit. Make a list of your current and planned electrical loads so the electrician can size the panel appropriately. Include any planned additions like EV chargers, heat pumps, pool equipment, or workshop tools. Research and interview at least three licensed electricians. Verify their license, insurance, and reviews. Ask specifically about their experience with panel upgrades and whether they handle the utility coordination and permitting or expect you to manage those separately. Get itemized written quotes that break down materials, labor, and fees. Choose based on value rather than lowest price because the quality of a panel installation affects your home safety for decades.
How Long Does a Panel Upgrade Take?
The timeline for a panel upgrade has two distinct phases: the scheduling and preparation phase, which is the longest part, and the actual installation day. Understanding both helps you plan around the disruption. The scheduling phase begins when you accept a quote and the electrician pulls a permit. Permit processing takes one to ten business days depending on your municipality. Some jurisdictions offer same-day or next-day permits for standard residential panel upgrades while others require plan review by the building department. After the permit is issued, the electrician schedules the utility company to disconnect your service on the installation day. Utility scheduling is often the longest wait, ranging from three business days to four weeks depending on the utility company and time of year. Summer months are busiest for both electricians and utilities, so plan spring or fall upgrades when possible. On installation day, the utility disconnects power by pulling the meter. This de-energizes the service entrance conductors so the electrician can safely work on the panel. Some utilities will pull the meter in the morning and return in the afternoon to reinstall it after inspection. Others require a full-day appointment. During the installation, your entire home will be without power for four to ten hours. A simple panel swap with the same amperage takes four to six hours. A full 100-to-200-amp upgrade with new service entrance cable and meter base takes six to ten hours. Plan accordingly by charging devices beforehand, having coolers ready for refrigerated food if the work extends past six hours, and avoiding scheduling on days with extreme heat or cold when you need climate control. After the electrician finishes, the building inspector must verify the work before the utility reconnects power. Some jurisdictions allow same-day inspection if you schedule in advance. Others require a separate inspection appointment the following day, meaning you spend a night without power. Ask your electrician about the local inspection process before scheduling so you can plan for this possibility. The total elapsed time from accepting a quote to having your new panel energized is typically two to six weeks, with most of that time spent waiting for permits and utility scheduling rather than actual work. If you are upgrading because you need to install an EV charger or heat pump, start the panel upgrade process first and schedule the subsequent work to begin after the panel is ready.
Financing Options and Return on Investment
A panel upgrade is a significant expense, but several financing options can make it manageable, and the return on investment is strong whether you measure it in safety, home value, or enabled savings from other electrical improvements. Cash payment is straightforward and avoids interest costs. If you have the budget, paying $2,000-$5,000 outright for a panel upgrade is the simplest approach. Many electricians offer 5-10 percent discounts for cash or check payment because it eliminates their credit card processing fees. Home improvement loans from banks, credit unions, and online lenders offer rates of 6-12 percent for unsecured personal loans. For a $3,000 panel upgrade financed over 36 months at 8 percent interest, monthly payments are approximately $94 with total interest of $388. Some lenders specialize in home improvement and offer promotional rates. Home equity lines of credit provide lower interest rates of 7-10 percent because the loan is secured by your home equity. HELOCs make sense for larger projects where the panel upgrade is part of a broader electrical improvement plan that includes EV charger installation, solar preparation, or whole-home rewiring. Credit cards with zero-percent promotional periods can effectively provide interest-free financing if you pay off the balance before the promotional period ends. Many electricians accept credit cards, though some add a 2-3 percent surcharge. Some utility companies offer on-bill financing for electrical upgrades that support electrification goals like EV charger readiness or heat pump installation. These programs roll the upgrade cost into your monthly utility bill at low or zero interest. Check with your utility company for available programs. The return on investment for a panel upgrade comes in several forms. Home value typically increases by 1-2 percent of home value or $3,000-$8,000 for an average home when upgrading from 100 to 200 amps, often exceeding the upgrade cost. Insurance premiums may decrease by $100-$300 per year after upgrading from problematic panel brands like Federal Pacific or Zinsco. The upgrade enables further improvements like EV charging, saving $500-$1,000 per year in fuel costs, and heat pump installation, saving $500-$1,500 per year in heating costs. Solar panel installation, which requires adequate panel capacity, provides $1,000-$2,000 per year in electricity savings. When viewed as an enabler of these subsequent improvements, the panel upgrade ROI multiplies significantly. A $3,000 panel upgrade that enables a $15,000 solar installation generating $1,500 per year in savings creates a combined ROI that far exceeds either investment alone.